Take and Hold (often shortened to T&H, TAH, or TNH) is a popular and challenging game mode of H3VR. The premise is that the player must advance through an enemy-filled map, capturing "Holds," and using the Override Tokens earned from those holds to purchase randomly chosen weapons and power-ups. The game mode has an extensive variety of challenges for the player to choose from, and different settings to increase the difficulty.
The original version of Take & Hold is available as a separate Legacy scene.
Take and Hold is part of a community-run tournament, called First 2 Wurst.

What is Take & Hold -- F2W
Take and Hold Overview, for the F2W Tournament
Leaderboards[]
The game mode has online leaderboards, which are specific to a particular run's settings. For example, one leaderboard would be for Classic Loadout Louis, Limited Ammo, Standard Health, 5 Holds, and another could be for Zeke Zombiehunter, Spawn-Lock, One-Hit, Endless. Your placement on the leaderboard is determined by how many points you score by the end.
Start Menu[]
Before starting, the user will select their particular settings for the run.
Character[]
Selecting a character determines what weapons the player starts with, what weapons are available for purchase in the Supply Points, and what the enemy Sosigs will be armed with. Characters are divided between the following three categories.
Daring Defaults can have weapons from any era appear, though all enemies are equipped with modern armor. "Classic Progression" notes that the starting firearm tends to be relatively weak (i.e. a pistol) and weapons at supply points gradually get better, but so does the enemy's equipment, in terms of both firearms and armor. Nearly all weapon classes in the game are available from supply points in Classic Progression. With the exception of Ricky Dicky Random, firearms can be real-world or "Grounded Fictional."
- Beginner Blake: Less-intense version of Classic Loadout Louis. Hold phases have fewer waves and encryption nodes are fewer.
- Classic Loadout Louis: The Default experience. Player experiences a steady progression in terms of weapons availability and difficulty.
- Onsite Procurement Patrice: Classic weapons loadout. Spawns with knife only, no starting currency.
- Ricky Dicky Random: Every weapon purchase is random and can be any category or time period and includes every firearm in H3VR, including a few specific to Take & Hold. Spawns with any firearm and a melee weapon.
")
")
")
")
Wieners Through Time have an equivalent progression but are limited to their era's weapons. For example, Calico's starting weapons are limited to single action revolvers and pocket pistols. Enemies in Grayson and Calico lack armor, and Franky has low-tier armor. To compensate, enemies will more frequently carry better weapons than you do. Ori is the most similar to classic progression but is limited exclusively to modern weapons. All weapons are strictly realistic, with no "grounded fictional" or novelty ammunition included.
- Operator Ori: Post-1990 Modern weapons.
- Soldier of Fortune Franky: 1950-1990 Cold War weapons.
- Grumbly GI Grayson: 1890-1950 Mid-Century weapons.
- Cowwiener Calico: 1860-1914 Wild West weapons.
")
")
")
")
Memetastic Meats are thematic, fiction-based characters with more specialized mechanics in terms of weapon pools and enemy types. Memetastic Meats tends to be far more challenging, especially on limited ammo or one-hit health, and can have cross-faction combat.
- Welldone Freemeat: Half-Life 2 themed character. Exclusively features Shelf Life weapons and enemies.
- Zeke Zombiehunter: Zombie-hunter themed character. Primarily features civilian guns, as well as meme guns. Enemies include survivors, zombies, and Pacification squads.
- Flaccid Steak: Metal Gear themed character. Similar to Onsite Procurement Patrice, but with much more emphasis on boss battles and ambushing enemies.
")
")
")
Competitive Casings are built entirely around Tournaments and high-level challenges.
- Tournament Toby is the main competitive character; weapon progression is slower with weaker starting weapons than on Daring Defaults, while enemies possess tougher armor. Weapon RNG is also reduced as each Hold has a specific tier of weapons, meaning that weapons from the previous hold will not appear on the latest hold.
")
Scoring Competition Table[]
These settings determine which leaderboard you will be competing against with other players. There are eight scoreboards per character.
- Game Length: Choose between completing 5 Hold Standard, 3 Hold Short, or Endless.
- Equipment Mode: Enable or disable Spawn-Locking. Fewer enemies appear in Limited Ammo mode.
- Health Mode: Choose between Standard health (5000), Hardcore (100) or Custom. Custom disables scoring and has the following options: Human (2000), Armored (4000), Meaty (10,000), Beefy (40,000), and Juggernaut (100,000).
- Hold Seed Order: Select the Hold sequence; this determines the order of rooms that you'll be playing in. Choose from 10 different sequences, or be randomly assigned a sequence. Please see each map page for details on sequences.
Scoring Multiplier Bonus[]
These settings will multiply your score based on the level of difficulty. They do not put you on a different leaderboard.
- AI Difficulty: Choose between Hardcore (3x multiplier) or Arcade (1x multiplier). Arcade enemies take more damage, deal less damage, and enemy bullets travel slower. Hardcore enemies will use more advanced tactics like crouching/dropping prone to reload and will use cover more often.
- Radar Detect Mode: Be able to detect Sosigs on your radar. Omnipresent (1x), Standard (2x) or Off (3x)
- Target Mode: Select All Types(3x), Simple (Static encryptions only) (2x) or No Targets (simply survive for the entire duration)(1x) for the Hold Phase.
Utility Options[]
These settings are other options for your convenience.
- Item Spawner: Have an item spawner appear near your spawn point. This option disables scoring.
- Sosiggun Reloading: Reload Sosigguns by shaking them. This option disables scoring.
- BG Audio: Enables or disables music.
- AI Narrator: Enables or disables the Narrator voice.
- Radar: places the radar under your left or right controller.
Environment[]
The player can select the following maps:
- Classic Hallways: Indoor labyrinth about 50m in total length, with three different floors for some vertical play. Most engagements will be within 15-25m. CQB oriented experience.
- Northest Dakota: Based on the Winter Wasteland scene, but modified for Take and Hold. Features plenty of long-range engagements and vertical pathing; Locomotion Tools are very useful here.
- Institution: Indoor Labyrinth with much more varied room layouts and verticality than Classic Hallways; also features environmental hazards and Constructs. Players can fast-travel to different sectors and use ziplines built into many rooms.
")
")
")
Starting Point[]
Once you've locked in your settings and eaten the hot dog in front of you, you will appear in a room with an orange case and a few other items. The cases always contain a weapon chosen from a specific pool of weapons, and will usually be on the weaker side of your character's available weapons (typically a pistol or manually-operated rifle/shotgun of some sort).
You will notice that beneath your left or right controller is a radar; the compass will guide you to the next Hold and nearest Supply Point, as well as show nearby Sosigs as red blips.
Enemies[]

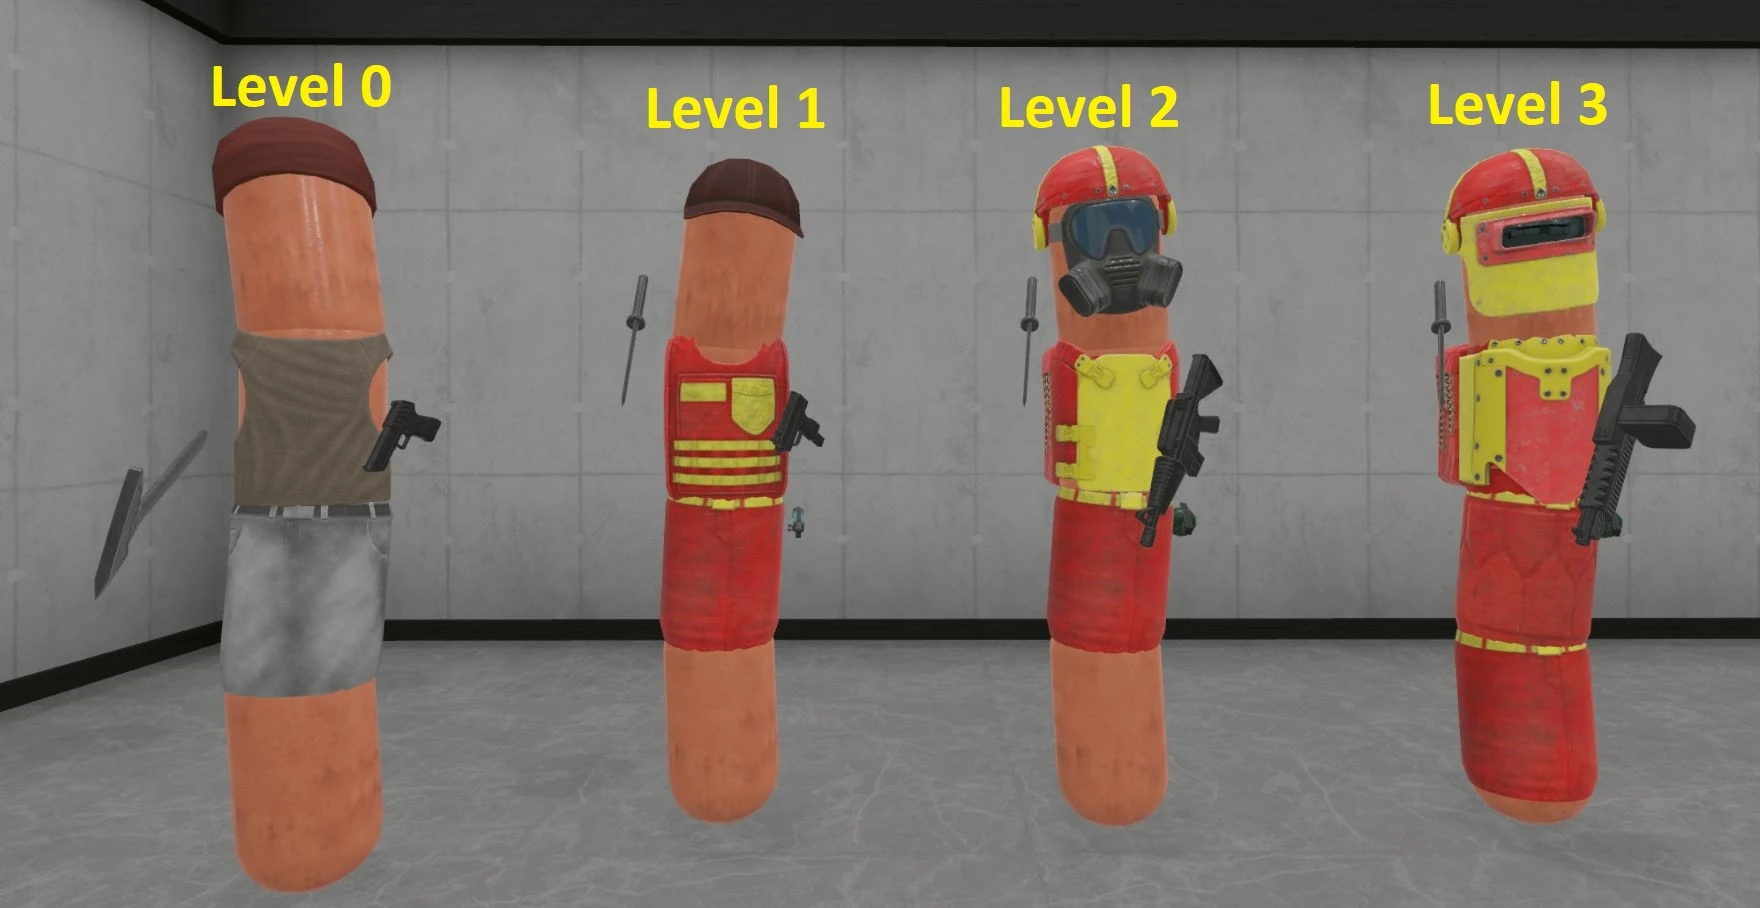
Sosigs with increasing levels of armor; enemy armor and weapon strength will increase with each hold.
Your primary enemies are Sosigs, giant hotdogs armed with rubber guns, grenades, and melee weapons. Individually, Sosigs are fairly weak and stupid, but they're usually found in groups that can easily overwhelm the player. Depending on the character chosen, Sosigs will be armed with different weapons and have differing levels of armor. Sosigs are armed with Sosigguns, and frequently wear armor that gets more difficult to defeat as the game progresses.
Enemies can be found in three different areas for each phase of Take & Hold:
- On Patrol, in groups of 2-4 wandering about in the hallways. They are attracted to sound, especially gun fire. The majority of characters do not have patrols on the first hold. More patrols will spawn if the player gets spotted by Sosigs or by specific Constructs.
- At Supply Points, where about 1-3 of the same enemy type will guard a room.
- At Hold Points: during the Hold phase, waves of Sosigs will come into the room from any available entrance. Some enemies appear exclusively during the hold phase and can be quite dangerous.
In addition, the player may face drone-type enemies and defensive emplacements called Constructs, specifically in Institution. These appear primarily in the Take phase and the player is not required to engage them; however, they can alert Sosigs to the player's presence if the player isn't careful.
Supply Points[]
Supply Points are found in between Holds. To purchase anything from a supply point, you need Override Tokens, which are normally earned by completing Holds. However, each Supply Point usually also has a few white crates that can be smashed open. These can contain Override Tokens (which are represented as blue squares, typically one per Supply Point) or health orbs (represented as green diamonds, recover about 1000 health). You can see how many override tokens you have on a console near the top of the panel.
Object Constructor[]
The primary interface at each Supply Point is the Constructor. Constructors have five different items available: A firearm, a melee weapon or attachment, a grenade or powerup, a Utility item (ie Grapple, Rangefinder, etc), and a backpack. Supply points will have progressively better weapons as you complete more holds, but will also be more expensive. Also, keep in mind that previous supply points will disappear as you complete the next hold.
Note that different weapons and equipment become available at each Hold, but only one particular weapon class is randomly selected. The player can spend a token to unlock all available weapon classes. Furthermore, buying a single weapon will make all subsequent weapon purchases will be increased by 1 token, until the player reaches the next hold.
Each Supply point also has the following additional consoles:
Ammo Reloader[]
Place your gun or magazines on the table to detect which ammo you need. Refill your mags or spawn individual cartridges. This can be done for free, but only for basic ammo types (FMJ, JHP). You can spend tokens to unlock your cartridge of choice, which can be very useful if you're up against tough enemies and need something like AP or API. However, the more useful the cartridge, the more expensive it becomes.
| Type | Cost (Tokens) |
|---|---|
| FMJ | 0 |
| JHP | 0 |
| Soft Point | 0 |
| Tracers | 1 |
| FMJ +P | 2 |
| JHP +P | 2 |
| Penetrator | 3 |
| AP | 4 |
| API +P | 4 |
| API | 5 |
| Type | Cost (Tokens) |
|---|---|
| 00 Buckshot | 0 |
| No.2 Buckshot | 0 |
| No.4 Buckshot | 0 |
| Dragon's Breath | 1 |
| Triple-Hit | 1 |
| Slugs | 1 |
| Flechette | 3 |
| SWAG-12 HE | 7 |
If your guns can take clips or speedloaders, you can get more for free.
This panel can also reload Sosigguns, even with sosiggun reloading turned off.
Item Recycler[]
- Sell firearms that you don't need for Override Tokens. You will always get one token per weapon.
- Attachments, melee weapons, grenades, disposable weapons, and magazines cannot be traded in.
Magazine Shop[]
- Purchase extra magazines for 2 Override Tokens. These magazines will be the same size as the one you're duplicating.
- Purchase a larger size magazine for 3 Override Tokens. The next largest available size will be selected (eg, if you have a 20 round STANAG, it will be upgraded to a 25 round STANAG).
Refer to each character page to see what weapons are available. Prices for a particular weapons category will vary between all characters.
")
")
Holds[]
A typical run has you capturing five holds, with each hold getting more progressively difficult, as the enemies become better equipped and the holds taken longer to capture. Each hold always has a small number of Sosigs waiting inside.
To start capturing a hold, run into the blue floating orb. This will cause any enemy Sosigs in the room to disintegrate, and several destructible walls will appear in the room. The entrances to the room will be barred with red lasers. Take a defensible position and repel any Sosigs that come into the room.
Eventually, the announcer will tell you when encryption nodes need to be destroyed. You will have a limited window of about two minutes to shoot all of the nodes in the room. Once all nodes have been destroyed, another wave will start, until the hold is taken. If the player fails to destroy all of the encryption nodes before time runs out, the player will not receive the full payout of override tokens.
See Encryption Node for more information about specific Nodes.
Hold Completion[]
If playing endless mode, the first five holds will be identical to a standard five-hold run. The next five holds will be more varied in both difficulty and challenge; some will be light on enemies and heavy on targets, or vice versa. The tenth hold is substantially more difficult than hold five. All subsequent holds will cycle through previous levels of difficulty until the player is killed.
| Hold Completed | Tokens Earned |
|---|---|
| Start | 3 |
| 1 | 3 |
| 2 | 4 |
| 3 | 5 |
| 4 | 5 |
| Fail to complete | 1 |
Scoring[]
The following scoring calculations are used in your final score:
- Holds Completed
- Speed for taking Holds (i.e. how quickly you can shoot the encryption nodes, after they spawn)
- Accuracy
- Sosig Kills (Only kills during the Hold count)
- Kill streaks (Killing sosigs in quick succession, less than a second in between kills)
- Not taking damage during Take/Hold phases
- Not alerting enemies during the Take phase
- Style (Variety and difficulty of kills, i.e. headshots, ripping a sosig apart, etc)
This is in addition to the score multipliers that are selected in the Take and Hold lobby.
Tips & Tricks[]
- When starting out, you won't have much opportunity to buy a new weapon before completing the first Hold, especially with Onsite Procurement Patrice. Picking up dropped Sosigguns can help supplement your arsenal if you feel under-prepared for an encounter.
- One Override Token spawns in a box in the Supply Point after every hold.
- The key to success is getting very good at reloading and accurately shooting with the weapons in your character's arsenal. You can use the Wrist Menu to see the name of the weapon you are currently holding, so that you know which ones to practice with in any of the sandbox modes. You can also save any weapons you obtained at the end of the game by using the Item Spawner's vault function.
- If you've disabled Spawn-Locking, be sure to bring lots of extra ammo with you, including topping off spent magazines with individual cartridges. Also, be sure to pick up any magazines you've dropped, as buying more magazines can be expensive.
- Be sure to visit all of the available supply points before spending tokens, especially if you're considering re-rolling.
- If you have the Item Spawner turned on, keep in mind that the Item Spawner may interfere with the Supply Point interface if a Supply Point appears in that room. Use the Item Spawner's ability to raise and lower itself if needed.
- Any equipment that is not on your person (i.e. guns, mags, etc) automatically disappear upon the start of a Hold Phase. Sell guns you don't need at recyclers if you no longer have room to carry them.
- Any weapon with a bespoke attachment (e.g. the SVT40 and the PU scope) has a 50% chance of that attachment spawning with the weapon (so long as that weapon didn't come from a weapon crate). For weapons that spawn as the player's first weapon upon starting a round, it becomes 100%.
Gallery[]
")
| Take and Hold | |
|---|---|
| Environments | Classic • Institution • Northest Dakota • War Is For Wieners (scrapped) |
| Enemies | Construct • Encryption Node • Sosig |
| Daring Defaults | Beginner Blake • Classic Loadout Louis • Onsite Procurement Patrice • Ricky Dicky Random |
| Wieners Through Time | Operator Ori • Soldier of Fortune Franky • Grumbly GI Grayson • Cowwiener Calico |
| Memetastic Meats | Welldone Freemeat • Zeke Zombiehunter • Flaccid Steak • Sascha Sosiki (scrapped) |
| Scenes | |
|---|---|
| Sandbox & Scenarios | Arizona Range • Arizona at night • Breaching Proto • Friendly 45 Range • GP_Hangar • Grillhouse • Indoor Range • Proving Grounds • Sampler Platter • Sandtrap • Sniper Range • The GUNnasium • Warehouse Range |
| Game Modes & Holiday Scenes | Arcade Proto • Boomskee • Meat Fortress • Meat Grinder • Meatmas Cappocoloseum • Meatmas Snowglobe • M.E.A.T.S. Preview • Return of the Rotwieners • Winter Wasteland • Wurstworld |
| Take and Hold | Lobby • Classic Map • Northest Dakota |
| Prototype & Legacy Scenes | Arena Proto • Boomskee Classic • Mini-Arena • Take and Hold Classic • Take and Hold: Containment |
| Scrapped Scenes | 301 Lawn Darts • Modular Range • Rise of the Rotwieners • Spooky 45 Range • User Generated Scenario Editor • War Is For Wieners |
| Other | Main Menu |